


ROTAM FAQ
Dear customer, it is very important for us that you find a solution to your issue(s) in the shortest delays. Therefore, please find below a list of the frequently asked questions below concerning the ROTAM arthrometer.
If the issue you are confronted to does not relate to any of the topics below, please contact us as soon as possible and we will treat your demand in the shortest delays.
FAQ - Frequently asked questions:
My device won't connect, what should I do?
- Run a Reset/connect: View the photo below to see how to run a reset/connect
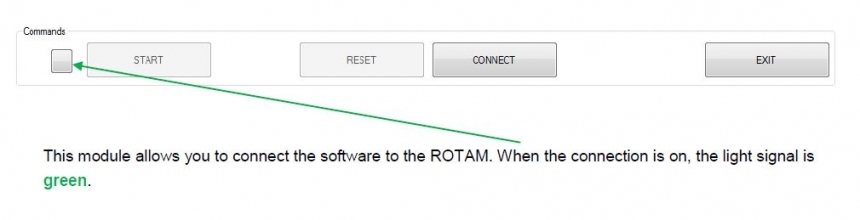
Photo description:
In some cases, there can be written "Failure when connecting device" in the lower right corner. Here is the solution:
- 1) Click on the RESET button located in the lower center part of the LDA software.
- 2) Click on the CONNECT button located in the lower center part of the LDA software.
- 3) The device should now be connected. This can be confirmed by looking at the green square located next to the START button. The green square should be blinking.
If the device does not reconnect, make sure the emergency stop button is not triggered. If it is, follow the instructions in the topic "I accidentally pressed the Emergency Stop button and my device won't reconnect".
If the problem persists, contact us and we will treat your demand in the shortest delays.
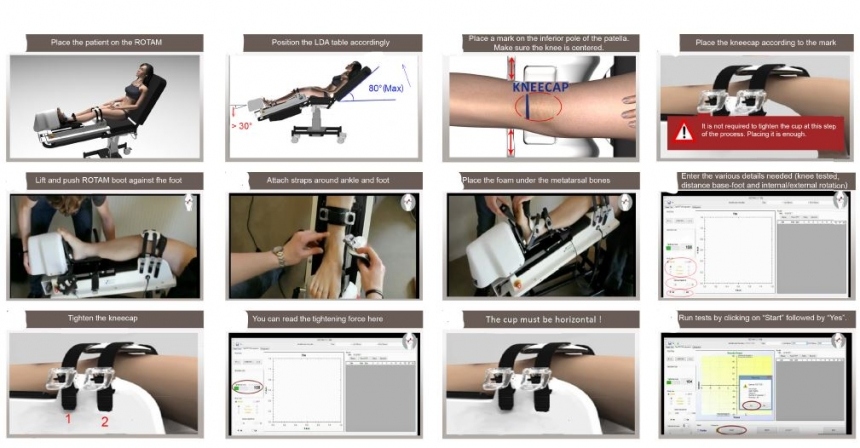
How do I correctly position my patient?
I did a reset/connect and it still won't connect, what should I do?
- Check if the Emergency button is triggered : If it is, watch the photo & read the instructions below it.

Photo description:
There should be written "Emergency stop!" in the lower-right part of the screen and there should be a red square next to the START button if the button has been triggered. Here is the solution:
- 1) Click on the RESET button located in the lower middle part of the screen.
- 2) Click on the CONNECT button located in the lower middle part of the screen.
- 3) A message box "Information" with instructions should appear.
- 4) Unlock the Emergency stop button by twisting it.
- 5) Disconnect the power supply during 5 seconds and reconnect it.
- 6) Click on the RESET button located in the lower middle part of the screen.
- 7) Click on the CONNECT button located in the lower middle part of the screen.
- 8) The ROTAM should now be connected. This can be confirmed by looking at the green square next to the START button. The green square should be blinking.
If the problem persists, contact us and we will treat your demand in the shortest delays.
I accidentally pushed the Emergency Stop button and my device won't reconnect.
- Please watch this photo & follow the instructions written below it:


Photo description:
There should be written "Emergency stop!" in the lower-right part of the screen and there should be a red square next to the START button if the button has been triggered. Here is the solution:
- 1) Click on the RESET button located in the lower middle part of the screen
- 2) Click on the CONNECT button located in the lower middle part of the screen
- 3) A message box "Information" with instructions should appear
- 4) Unlock the Emergency stop button by twisting it
- 5) Disconnect the power supply during 5 seconds and reconnect it
- 6) Click on the RESET button located in the lower middle part of the screen
- 7) Click on the CONNECT button located in the lower middle part of the screen
- 8) The ROTAM should now be connected. This can be confirmed by looking at the green square next to the START button. The green square should be blinking
If this does not resolve your issue, contact us and we will treat your demand in the shortest delays.
How can I create a new patient file?
- Please watch this photo & follow the instructions written below it:
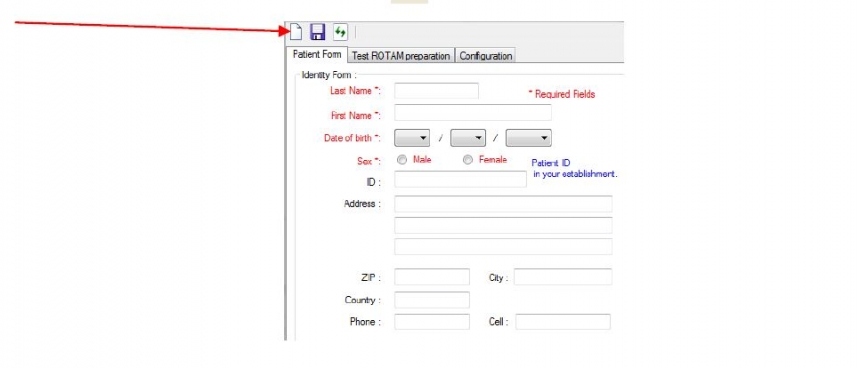
Photo description:
- 1) Start the ROTAM LDA software
- 2) Click on the "New" button located in the top left hand corner of the screen.
- 3) Enter the patient's information below. It is always required to enter the details concerning the:
- Last Name
- First name
- Date of birth
- Gender
- 4) Click on the "Save" button located in the top left hand corner of the screen.
- 5) An "Information" dialog box should appear stating, "The information of this patient has been registered".
How do I load a patient file?
- Please watch this photo & follow the instructions written below it:

Photo description:
- 1) Turn the ROTAM LDA software on.
- 2) Click on the box next to "Last Name" in the top right hand corner of the LDA software.
- 3) Choose the last name of the patient you tested previously.
- 4) Click on the box located next to "First name" in the top right hand corner of the LDA software.
- 5) Choose the first name of the patient you tested previously.
- 6) Click on the "Load" button located on the far top right hand corner of the LDA software.
- 7) A message box should appear in the middle of the screen with details concerning the patient file you intend to load, click on "OK" if the details match.
- 8) Click on the tab "Test ROTAM presentation" to see previous results and/or run new tibial rotation tests.
How do I launch a test?
- Please watch this photo & follow the instructions written below it:
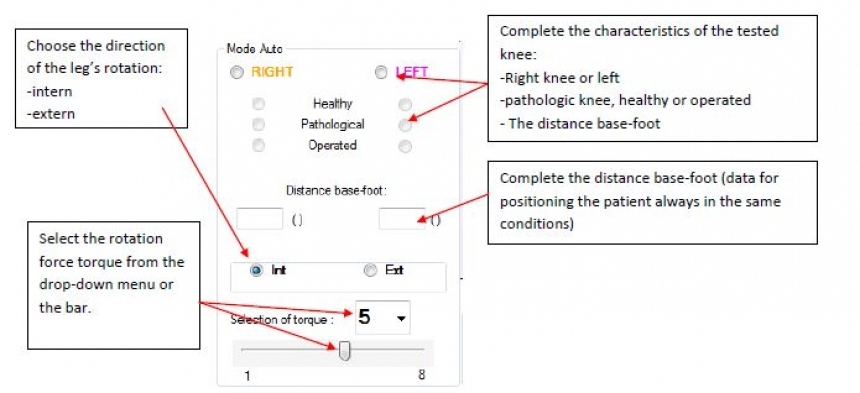
Photo description:
- 1) Make sure you loaded a patient file, check out the topic "How do I load a patient file" to learn how to load a patient file.
- 2) Make sure you completed all the information required to launch a test (left side of the screen). The following information is required.
- 3) Click on the START button located in the left part of the screen.
- 4) A "Warning dialog" box should appear summing up all the details you entered, click on "YES".
- 5) The assessment should now be taking place.
How do I display the curves after having performed a test?
- Please watch this photo & follow the instructions written below it:
Photo description:
- 1) Make sure you loaded a patient file, check out the topic "How do I load a patient file" to learn how to load a patient file.
- 2) Check the boxes of the lines containing the results you want to display. Multiple boxes may be checked at the same time.
- 3) Click on the "DISPLAY" button located at the top of the tables chart.
- 4) The curves should now be displayed on the graph.
How do I export the results on a PDF file?
- Please watch this photo & follow the instructions written below it:
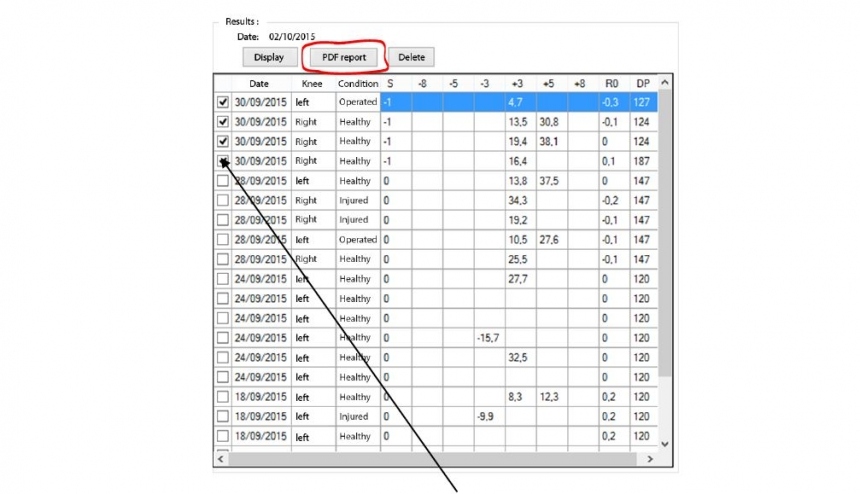
Photo description:
- 1) Make sure you loaded a patient file, check out the topic "How do I load a patient file" to learn how to load a patient file.
- 2) Check the boxes of the lines containing the results you want to display in the PDF report. Multiple boxes may be checked at the same time.
- 3) Click on the "PDF report" button located on top of the tables chart.
- 4) A "Comments" message box should now appear on the screen. Click on "YES" if you want to add comments or "NO" if you don't want to.
- 5) Write your comment if you chose to add some.
- 6) Click on "Valid".
- 7) The PDF file with the patient's details, results and comments you added should now automatically appear on your screen.
How do I delete a patient's entire file?
- Please watch this photo & follow the instructions written below it:
SUPPORT
 01/11/2023